

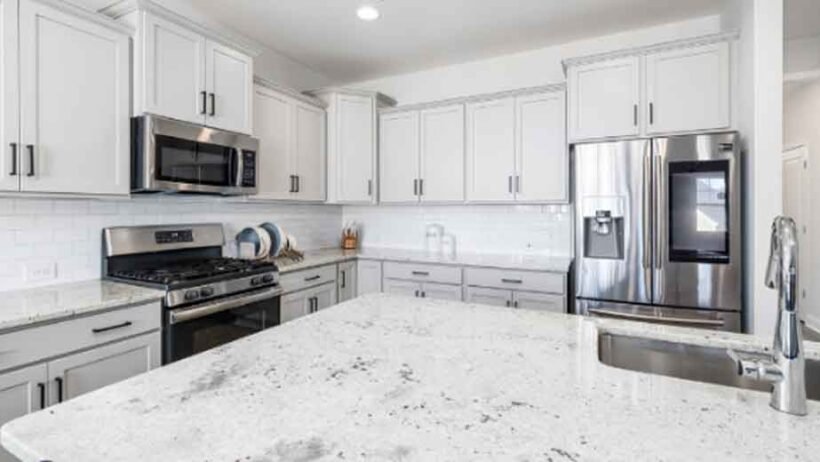
Working with a small kitchen doesn’t mean you’re stuck with a space that feels claustrophobic or dull. The truth is, your tile selections can fundamentally reshape both the functionality and appearance of your cooking area. Here’s something interesting: full backsplash coverage that extends all the way to your cabinets, range hood, or even touches the ceiling is gaining serious traction among homeowners. When you make thoughtful design choices, even the most compact kitchen can feel airy, luminous, and genuinely sophisticated. What you’ll find here are actionable strategies that help you squeeze value from every available inch while showcasing your unique style preferences.
The Visual Impact of Backsplash Tiles in Compact Kitchens
Your tile selection fundamentally alters how visitors and family members experience your kitchen’s dimensions and atmosphere. Making intelligent choices here creates optical expansion that transforms cramped quarters into surprisingly roomy spaces.
Here’s something most people overlook: placing tiles vertically pulls the eye upward, which tricks your brain into perceiving higher ceilings than what actually exists. Conversely, horizontal arrangements widen narrow kitchens, giving the impression of extra square footage you don’t physically have. Diagonal configurations like herringbone introduce movement and dimensional depth without demanding any additional real estate. These kitchen backsplash ideas succeed because they exploit how human perception processes spatial relationships.
Your orientation choice carries more weight than you’d initially think. Stacked vertical layouts emphasize height dramatically, while classic brick-style patterns naturally extend width perception.
Best Materials for Small Kitchen Backsplashes
Your material choice profoundly impacts both visual appeal and ongoing maintenance requirements in tight cooking environments. When you’re exploring options for your renovation, you’ll find that choosing quality kitchen backsplash tile from specialized retailers offers design-forward choices that suit various budgets and aesthetic preferences. Each material category brings distinctive advantages worth your careful consideration.
Glass Tiles for Maximum Light
Glass backsplashes transmit and reflect illumination better than any competing material option. You’ll find them in mini mosaics, standard subway dimensions, and expansive panel formats. Maintenance is refreshingly straightforward—most stains and splatters wipe away easily from the non-porous surface. Their transparency creates layered visual depth that makes solid walls seem less imposing and confining.
If you’re budget-conscious, attractive glass options exist that deliver premium aesthetics without the luxury price tag. This investment pays significant dividends in how dramatically it illuminates smaller kitchens.
Ceramic and Porcelain Versatility
These time-tested favorites remain popular for legitimate reasons—they’re durable, resist moisture effectively, and offer remarkable diversity. Smooth, textured, and embossed variations let you customize the tactile dimension of your space. The best tiles for small kitchen applications frequently come from this category, since they successfully balance affordability with aesthetic adaptability. Porcelain’s denser composition resists staining more effectively than standard ceramic.
You’ll encounter countless sizes, colors, and finishes that perform beautifully in compact configurations. This flexibility means you’re not sacrificing style for practical considerations.
Natural Stone Character
Marble, travertine, and slate introduce organic movement through their inherent veining patterns. These materials contribute depth without visual weightiness when you select them thoughtfully. Sealing requirements demand more upkeep than manufactured alternatives, though many homeowners gladly accept this tradeoff for the distinctive beauty.
Stone-look porcelain tiles provide convincing alternatives that eliminate sealing requirements while capturing authentic natural aesthetics. They’re especially smart selections for high-splash zones around sinks and cooking surfaces.
Size and Pattern Strategies That Maximize Space
Tile dimensions significantly influence how spacious your kitchen ultimately feels. Something to consider: the median spend on kitchen renovations has climbed to $60,000 over the past year (floridarealtors.org), reflecting increased investment in quality materials and thoughtful design. Intelligent sizing decisions make your investment deliver better results relative to your available square footage.
Large Format Tiles Minimize Interruption
Tiles measuring 12×24 inches or larger reduce grout lines that can visually fragment small spaces. Fewer seams generate a more continuous, unbroken surface area. Large format backsplash tiles particularly excel behind stoves or spanning complete walls. Installation demands careful wall preparation since large tiles reveal every substrate imperfection.
The seamless appearance they deliver makes kitchens feel more expensive and intentionally designed. They’re absolutely worth the additional installation effort for achieving that polished outcome.
Subway Tile Versatility
Classic 3×6-inch subway tiles adapt to virtually any design direction you pursue. Stack them vertically for height emphasis, arrange them horizontally for width, or experiment with herringbone for dynamic visual interest. Your grout color choice dramatically transforms their impact—matching grout creates subtle elegance while contrasting grout defines each tile.
Contemporary variations include beveled edges, handmade textures, and unexpected color choices. This small kitchen backsplash staple never truly falls from favor because it’s endlessly adaptable to changing trends.
Pattern Selection for Visual Interest
Trendy backsplash patterns like geometric designs and textured backsplash tiles inject character without requiring additional square footage. Hexagons, arabesque shapes, and fish scales create focal points that redirect attention away from limited space. The critical factor is balancing boldness with restraint—overly busy patterns can overwhelm when applied too liberally.
Consider featuring complex patterns in specific zones, like directly behind your stove, while maintaining simpler treatments in surrounding areas. This strategy creates intentional design moments without generating visual chaos.
Budget-Friendly Installation Approaches
Creating stunning backsplashes doesn’t demand unlimited financial resources. Strategic planning stretches your available budget while still delivering impressive results.
DIY Kitchen Backsplash Installation Considerations
DIY kitchen backsplash installation is genuinely achievable for homeowners with moderate skills and reasonable patience. Small kitchen backsplash ideas often work perfectly as first-time projects since they involve manageable square footage. You’ll need tile cutters, spacers, adhesive, grout, and several hours of focused attention.
Professional installation makes better sense when working with expensive materials, complex pattern layouts, or tricky configurations around obstacles. Labor costs typically represent 30-50% of total project expenses, so self-installation saves substantially.
Cost-Effective Material Alternatives
Ceramic tiles deliver luxury appearances at accessible price points. Peel-and-stick options have improved dramatically in recent years, offering legitimate temporary or permanent solutions. Discontinued tiles from clearance sections provide genuine bargains when you’re flexible about exact color matches.
Focus your splurge on highly visible areas while deploying budget-friendly materials in less prominent zones. This strategic mixing maximizes visual impact without completely draining your renovation budget.
Phased Installation for Spreading Costs
You don’t need to complete everything simultaneously. Start with your most visible section behind the stove or sink, then expand outward as funds become available. Minimalist kitchen backsplash design approaches work particularly well for phased installations since simpler patterns are easier to match during later stages.
This approach also lets you live with your initial choices before committing fully to materials and colors throughout the entire space.
Common Questions About Small Kitchen Backsplashes
Should backsplash extend to the ceiling in small kitchens?
Full-height backsplashes create dramatic vertical lines that make ceilings appear noticeably higher. They’re particularly effective in kitchens with limited floor space but standard ceiling heights. The continuous surface eliminates visual breaks that fragment small areas unnecessarily.
Can dark tiles work in compact kitchens?
Dark tiles absolutely work when you balance them with excellent lighting and lighter surrounding elements. They add sophisticated depth without making spaces feel smaller if you maintain adequate illumination throughout. Consider deploying them as accent features rather than covering every available surface.
What’s the easiest backsplash for beginners to install?
Peel-and-stick tiles and large-format options with minimal cutting requirements are most beginner-friendly. Subway tiles in straightforward patterns also work well for first-time installers. Avoid intricate mosaics and diagonal patterns until you’ve gained experience with simpler layouts first.
Final Thoughts on Transforming Small Kitchens
Smart backsplash design for small spaces demonstrates that limited square footage doesn’t equal limited style potential. The materials, sizes, colors, and patterns you select work synergistically to create visual expansion and functional beauty. Your choices reflect personal taste while maximizing every available inch. Whether you’re tackling installation yourself or hiring professionals, understanding these foundational principles ensures results that make your compact kitchen feel generous, bright, and authentically yours. Sometimes the smallest spaces inspire the most creative solutions.